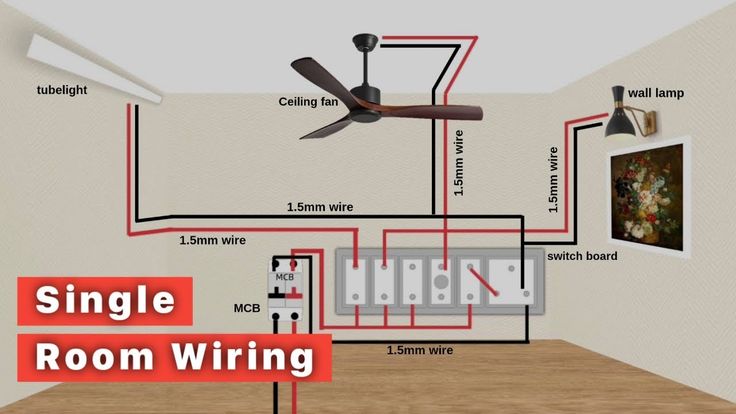
How To Wire A Room With Lights And Outlets

Wiring a room with lights and outlets is a fundamental aspect of residential construction and renovation projects. Proper wiring ensures safety, functionality, and compliance with building codes, making it essential for homeowners and contractors alike to understand the process. In this article, we’ll explore the steps involved in wiring a room with lights and outlets, from planning and preparation to installation and testing.
Planning and Preparation
Before diving into the wiring process, it’s crucial to assess the electrical needs and layout of the room. Determine the number and placement of lights, outlets, and switches based on the room’s size, function, and usage requirements. Creating a wiring diagram or schematic can help visualize the electrical circuitry and plan the installation more efficiently. By mapping out the connections and circuit layout in advance, you can streamline the installation process and minimize potential errors or oversights.
Wiring Lights in the Room
Installing light fixtures and switches is typically the first step in wiring a room. Begin by mounting the light fixtures on the ceiling or walls according to the room’s design and lighting requirements. Next, wire the switches to control the lights, ensuring proper connections and polarity to avoid issues with operation or safety. Connect the lights to the electrical circuit by running electrical cables from the fixtures to the switch box and ultimately to the electrical panel. It’s essential to make secure and properly insulated connections to ensure safety and reliability.
Installing Outlets in the Room
Determining the location and type of outlets is the next consideration in the wiring process. Plan for standard outlets, GFCI outlets (Ground Fault Circuit Interrupter), and specialty outlets based on the room’s usage and code requirements. Wire the outlets to the electrical circuit by running cables from the outlet boxes to the electrical panel. Make connections to the circuit wires and grounding system following electrical code regulations to ensure compliance and safety. Once the wiring is complete, test the outlets for functionality and safety using a voltage tester to verify proper wiring and grounding.
Final Inspection and Testing
After completing the wiring installation, it’s essential to conduct a thorough inspection and testing process to ensure everything is up to code and functioning correctly. Check for proper grounding, secure connections, and compliance with building codes during the inspection. Test the electrical circuit by energizing it and checking lights, outlets, and switches for proper operation. Address any issues or deficiencies identified during inspection and testing, making necessary adjustments or corrections to ensure the wiring meets safety standards and performs reliably. By following these steps and procedures, you can wire a room with lights and outlets safely and effectively, providing reliable electrical service for years to come.


