How To Build A Shower Pan On A Concrete Floor
Crafting the Foundation: A Step-by-Step Guide on How to Build a Shower Pan on a Concrete Floor
Introduction
Building a shower pan on a concrete floor is a crucial step in creating a durable and watertight shower enclosure. Whether you’re remodeling a bathroom or constructing a new one, understanding the process of building a shower pan is essential. This comprehensive guide will take you through the steps, materials, and frequently asked questions related to constructing a shower pan on a concrete floor.
Table of Contents
- Understanding the Importance of a Shower Pan
- Materials and Tools You’ll Need
- Assessing and Preparing the Concrete Floor
- Framing the Shower Pan
- Installing the Shower Pan Liner
- Creating the Slope for Proper Drainage
- Installing the Drain
- Applying Mortar and Setting the Tile
- Grouting and Sealing
- Common Mistakes to Avoid
- Maintenance Tips
- Frequently Asked Questions (FAQs)
- Conclusion
1. Understanding the Importance of a Shower Pan
A shower pan, also known as a shower base or shower tray, is the waterproof barrier beneath the shower floor that ensures proper drainage and prevents water from seeping into the subfloor. Building a solid and watertight shower pan is essential for preventing mold, mildew, and structural damage.
2. Materials and Tools You’ll Need
Gather the necessary materials and tools before starting the project. This includes plywood, shower pan liner, mortar mix, tile, grout, a drain assembly, and waterproofing materials. Tools such as a circular saw, trowel, level, and rubber gloves are essential for the construction process.
3. Assessing and Preparing the Concrete Floor
Begin by assessing the condition of the concrete floor. Ensure it is level, clean, and free of any cracks or damage. If necessary, repair and patch any imperfections before proceeding.
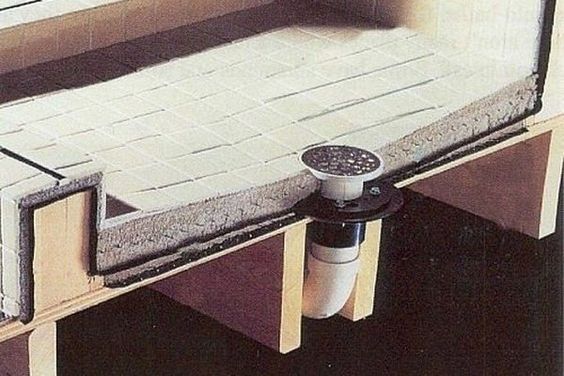
4. Framing the Shower Pan
Frame the shower pan using plywood to create a slope toward the drain. The slope is crucial for proper drainage and preventing water pooling. Use a level to ensure the framing is even and sloping toward the designated drain location.
5. Installing the Shower Pan Liner
Place a shower pan liner over the framed area, ensuring it extends up the walls and over the curb. The liner acts as a waterproof barrier, directing water toward the drain. Secure the liner in place with staples or adhesive, making sure there are no wrinkles.
6. Creating the Slope for Proper Drainage
To maintain a consistent slope toward the drain, add a layer of mortar over the shower pan liner. Shape the mortar to create the desired slope, starting from the outer edges toward the drain. Use a level to confirm the slope is even.
7. Installing the Drain
Install the shower drain assembly according to the manufacturer’s instructions. Ensure a watertight seal around the drain to prevent any leaks. The drain must align with the slope of the shower pan for effective drainage.
8. Applying Mortar and Setting the Tile
Apply a layer of mortar over the sloped shower pan surface. Press the tiles into the mortar, starting from the center and working outward. Use tile spacers to maintain even gaps between the tiles. Allow the mortar to cure before grouting.
9. Grouting and Sealing
Once the tiles are set, mix and apply the grout according to the manufacturer’s instructions. After the grout has cured, apply a high-quality sealer to the grout lines. Sealing helps prevent water penetration and makes cleaning easier.
10. Common Mistakes to Avoid
Avoiding common mistakes is crucial for the success of your shower pan construction. Some common errors include inadequate slope, improper liner installation, and using the wrong type of mortar or grout. Take the time to follow each step meticulously.
11. Maintenance Tips
Proper maintenance ensures the longevity of your shower pan and prevents issues such as mold and mildew. Regularly inspect the grout lines for any signs of damage or wear. Reseal the grout as needed to maintain water resistance.
12. Frequently Asked Questions:
1: Can I build a shower pan on an existing concrete floor?
Yes, you can build a shower pan on an existing concrete floor. Ensure the floor is level, clean, and free of any damage before starting the construction process.
2: Do I need a professional for building a shower pan?
While hiring a professional is an option, building a shower pan is a manageable DIY project with the right guidance and tools. Follow the steps carefully for a successful outcome.
3: Can I use any type of tile for the shower pan?
Choose tiles with a water absorption rating suitable for wet environments. Porcelain and ceramic tiles are popular choices for shower floors due to their durability and water-resistant properties.
4: How long does it take to build a shower pan?
The timeline depends on factors such as the size of the shower and the curing times for mortar and grout. Generally, the construction process may take a few days to a week.
5: Do I need a special drain for a shower pan?
Yes, use a shower drain assembly designed for effective water drainage. The drain should align with the slope of the shower pan and have a secure, watertight seal.
6: Can I build a shower pan without a liner?
Using a shower pan liner is a crucial step to ensure waterproofing. Skipping this step may lead to water leakage, mold, and structural damage.
7: How often should I reseal the grout?
The frequency of resealing depends on factors such as the type of grout and the level of use. As a general guideline, consider resealing the grout every 6 to 12 months.
8: Can I install a prefabricated shower pan instead of building one?
Yes, prefabricated shower pans are available as an alternative to building one from scratch. These pans come in various materials and sizes, providing a convenient option for some projects.
9: Can I use a shower pan for a steam shower?
Yes, a properly constructed and sealed shower pan can be used for a steam shower. Ensure that the materials and construction methods are suitable for the increased humidity and temperature.
10: Can I install a shower pan without prior construction experience?
While some DIY skills are beneficial, building a shower pan is achievable for individuals with basic construction knowledge. Follow the step-by-step guide, and don’t hesitate to seek advice if needed.
13. Conclusion
Building a shower pan on a concrete floor is a rewarding endeavor that adds both functionality and aesthetic appeal to your bathroom. By understanding the importance of each step, gathering the necessary materials, and following the guidelines outlined in this guide, you can embark on this DIY project with confidence. A well-constructed shower pan ensures not only a watertight enclosure but also a solid foundation for the overall longevity of your bathroom space. Embrace the process, enjoy the results, and revel in the satisfaction of creating a shower pan that stands the test of time.